Hello everyone! Thanks for passing by! Today I'm here to make a very quick tutorial about how to make envelopes/homemade stationery. I've been getting some requests on my Ask.fm about how I make my own stationery, so I think it'd be cool to make my own tutorial explaining how I do it. The reason I started with this was, there isn't a huge variety of letter sets/envelopes in Barcelona. The sets they sell are rather plain and very boring haha, so I decided I could make my own without spending a fortune in kawaii stationery on Internet :)
It recquires a bit of practice and imagination I have to say (the first ones you make always look terrible haha), but once you get used to it you won't stop making more and more :) Just be patient and use your imagination a little bit!
Step 1: Pick two paper sheets from the same color/pattern. I use decorative/origami paper from the Danish brand Tiger.
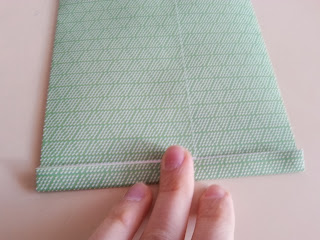
Step 2: Fold one of the paper sheets in 3.
Step 3: Put some glue in one of the borders of the paper sheet and fold it again.
Step 4: Fold the right side of the paper.
Optional: Cut the two corners and glue it back so it looks more like a real envelope!
Step 5: Fold the other side of your (Almost finished) envelope
Optional: Cut the corners again so it looks more realistic :B
Step 6: Cut one of the sides of the paper so you can put the letter paper in!
Step 7: Pick the other paper sheet and fold it twice.
Step 8: Now cut both sides of the paper, so you get four small paper sheets to write in :)
And you're done with your handmade stationery! :) Ah! You can always leave the envelope under something heavy for a few minutes (a book for example) so the glue sticks well to the paper. You can leave it plain or decorate it a little! But as you all might know by now, I always prefer to decorate my stationery a bit ^_^
I usually use brown paper, paper gift wrap, washi tape and sometimes stickers or plain name tags.
And TA-DA! There you go, your lovely handmade envelope finished :)
PS. Sorry for the low quality pictures! :( I'll try to make a better one eventually, but as I said, this is just a quick tutorial on how to make them.
Hope you like it anyway and don't hesitate to give me some feedback or comment :)
Much love from,
CL


Qué bonito queda! ^o^ Seguro que a tus penpals les encanta recibir cosas tuyas. Se valora mucho el tiempo dedicado. Ay, me daría hasta penita abrir las cartas ;u;
ReplyDeleteLeí tu post anterior y se me pasó comentar que me gustó mucho! Es muy bonito el hobby de escribirse cartas, y más en los tiempos que corren, donde todo es instantáneo. El simple hecho de ver el tipo de letra de cada persona y las cosas que te cuentan seguro que es muy bonito ^^ Yo tengo algunos amigos en el extanjero también y la verdad es que es una cercanía muy especial lo que se siente al leer sus cartas.
Me alegro de que continúes con este hobby, y aunque tenga sus partes no tan bonitas, seguro que al final sientes que vale la pena.
Ya que estoy, te deseo un feliz año nuevo! ^o^
Espero que tu vida en Corea siga yendo bien y que puedas guardar muchos buenos recuerdos y lecciones~
Disfruta mucho y cuídate :) Será emocionante leer acerca de tus aventuras!
Besos!
That's a nice lesson! :))) I think it maybe really useful for other persons. :)))
ReplyDeleteNadi.
original! =D
ReplyDeleteOh this is great! I usually just print a template on the back side of the paper haha.
ReplyDelete